
Yoni Elbaz
May 4, 2022
15
min read
Today you’ll learn how to install Google Analytics on Shopify and track the most important metrics.
Plus, you’re going to find out how to avoid some of the common mistakes that most Shopify store owners make when it comes to setting up extra, useful features.
We recommend bookmarking this page as a reference for your store or any future stores you may open. We’ll continue to update it, as the methods may change.
Also, if you’re looking for more info on what Loox displays in Google Analytics, check that out here. We’ll dive into why this is important later in the article.
In case you need some convincing, here’s some reasons why analytics are so important.
Google Analytics tells you…
Needless to say, understanding your Shopify store Google Analytics is key if you want to create and maintain a sales-generating store.
If the thought of hacking code together is scary for you, no need to worry! We’ve got you covered with the steps below.
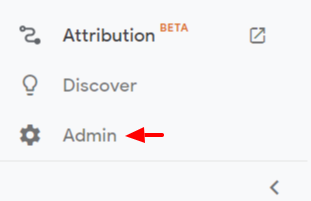
1. From here, you’ll see Tracking Info under the middle Property column.
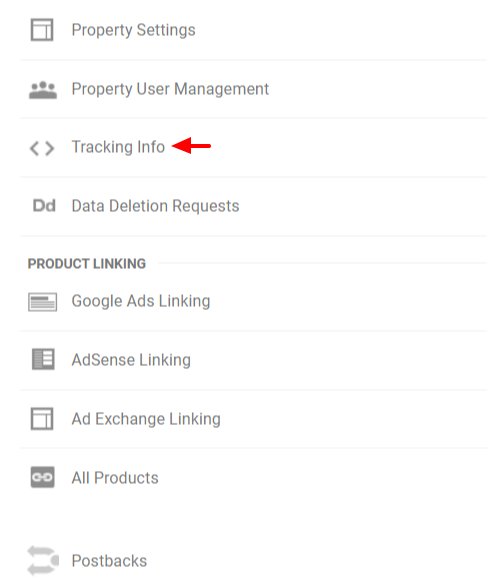
2. Click Tracking Info, as shown above, then Tracking Code.
3. Click on the code, it should auto-highlight it all. Copy (Ctrl + C) the code selected. It should look something like this:
4. <!– Global site tag (gtag.js) – Google Analytics –><script async src=”https://www.googletagmanager.com/gtag/js?id=UA-########-#“></script><script>window.dataLayer = window.dataLayer || [];function gtag(){dataLayer.push(arguments);}gtag(‘js’, new Date());gtag(‘config’, ‘UA-#########-#’);</script>
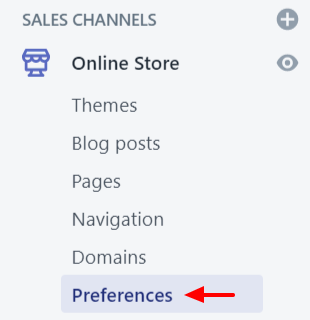
5. Open your Shopify store Admin and go to Online Store and then Preferences.
4. Scroll down until you get to the Google Analytics section and paste your code in the provided box. Then click Save at the top right.
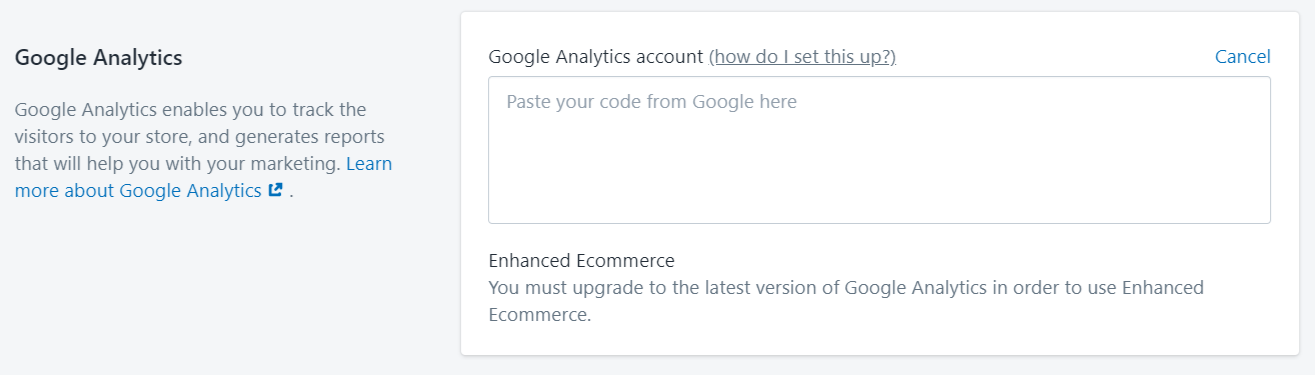
5. Make sure Use Enhanced Ecommerce is checked
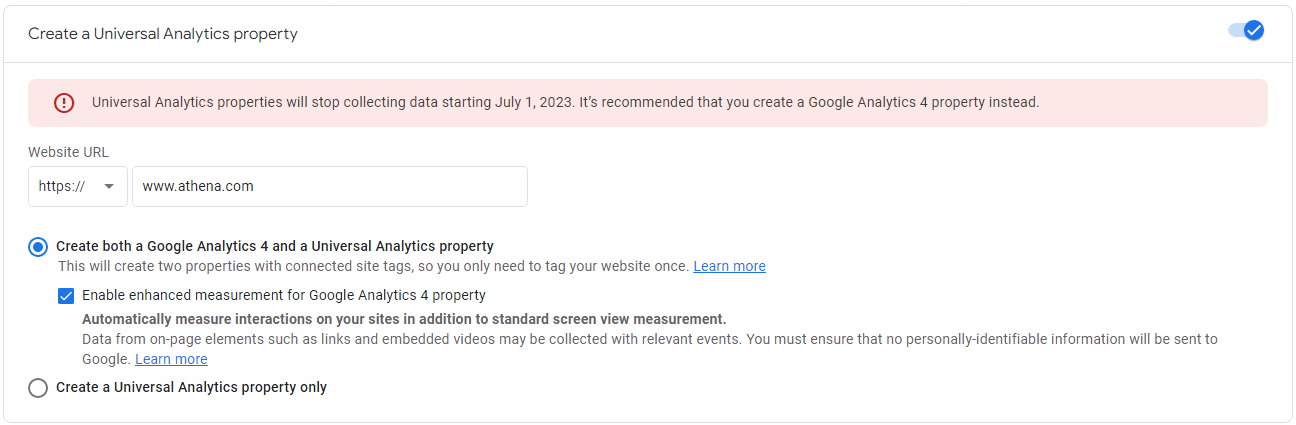
Google has announced that they will be retiring the Universal Analytics tag (aka GA3) and replacing it with the new GA4 tag. The official retirement date is set to July 2023.
Shopify doesn't yet support this new tag, so you still need to create a GA3 tag to install Google Analytics on your store.
What is Enhanced Ecommerce?
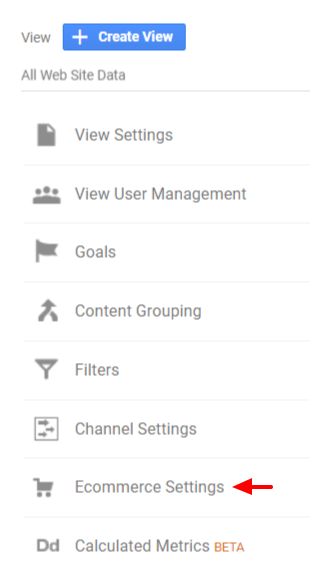
1. Go back to your Google Analytics account and go to Admin again on the left-hand side.
2. Click Ecommerce Settings under the right-hand View column.
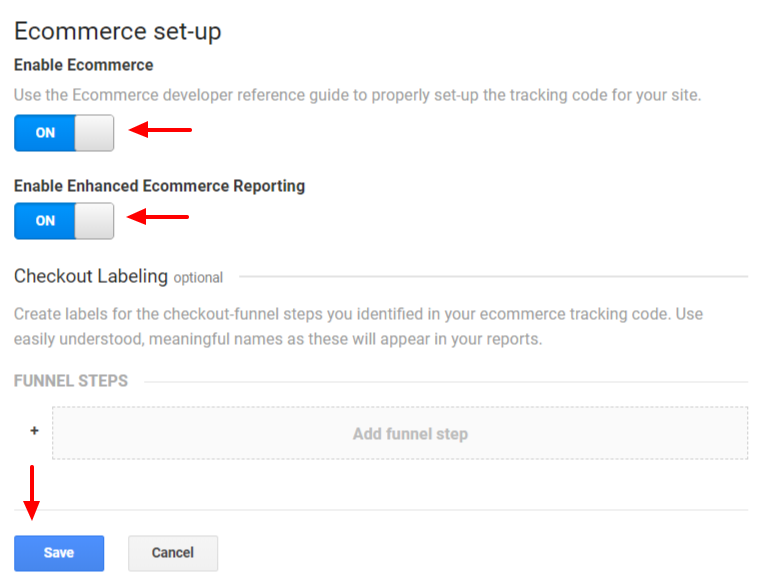
3. Make sure that Enable Ecommerce and Enable Enhanced Ecommerce Reporting are both ON.
Note: You’ll have to wait 24 hours to begin seeing reports in Google Analytics. But after you do, you’ll get to see reports like this:
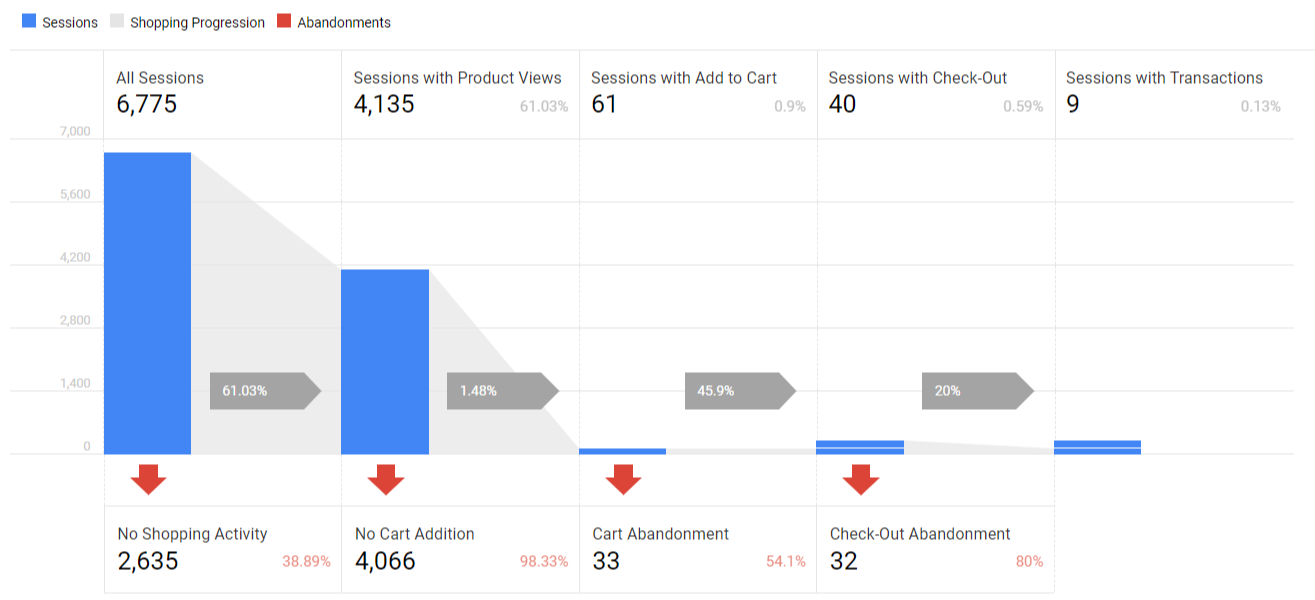
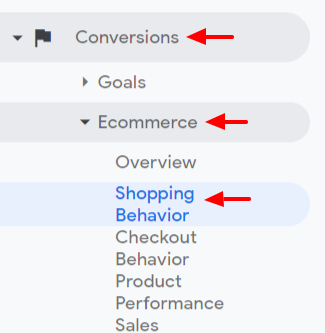
To get there, go to Conversion > Ecommerce > Shopping Behavior on the left-hand sidebar
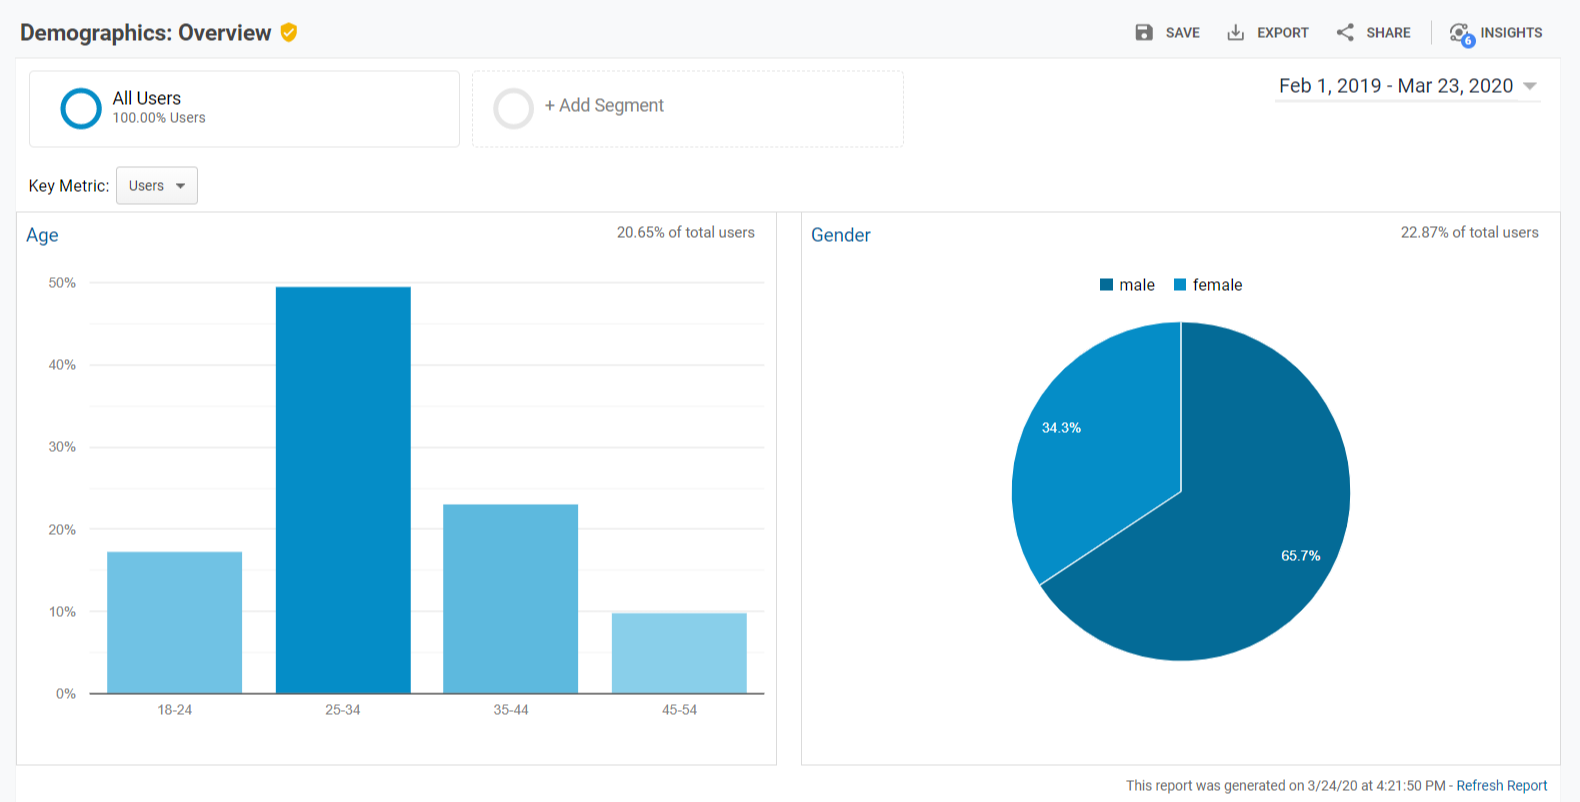
Demographics and Interest reports are an important part of your Google Analytics insights for your Shopify store.
They are what let you dive deeper into your actual customer avatar. You can see who buys and who browses. And then spend more to acquire those customers. All based on age, gender, and interests.
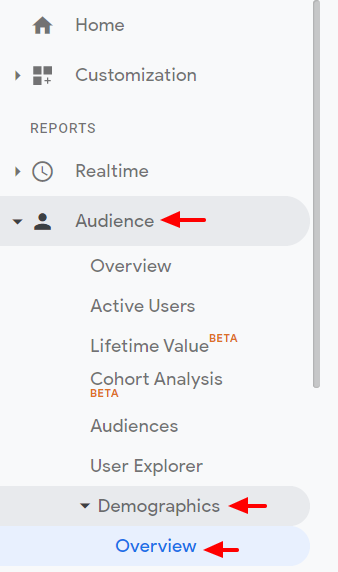
1. Navigate to Audience, then Demographics, and then Overview.
2. From here, you can click the blue Enable button
3. You should then get a success message. Congrats, that’s it!
4. If instead, you see a chart that looks like this already, congrats, you’ve already enabled Demographics.
43% of e-commerce traffic comes from organic Google search (Wolfgang Digital)
Wouldn’t you want to know the search terms of those visits? You should! Because this step will allow you to:
I’ll show you how to connect your Google Analytics account with Google Search Console to uncover these golden keywords being used on your site.
1. Go to your Google Analytics account and go to Admin again on the left-hand side.
2. Click Property Settings under the middle Property column.
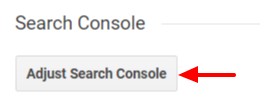
3. Scroll down and click Adjust Search Console
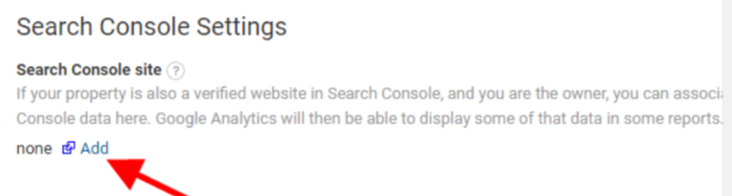
4. Click Add
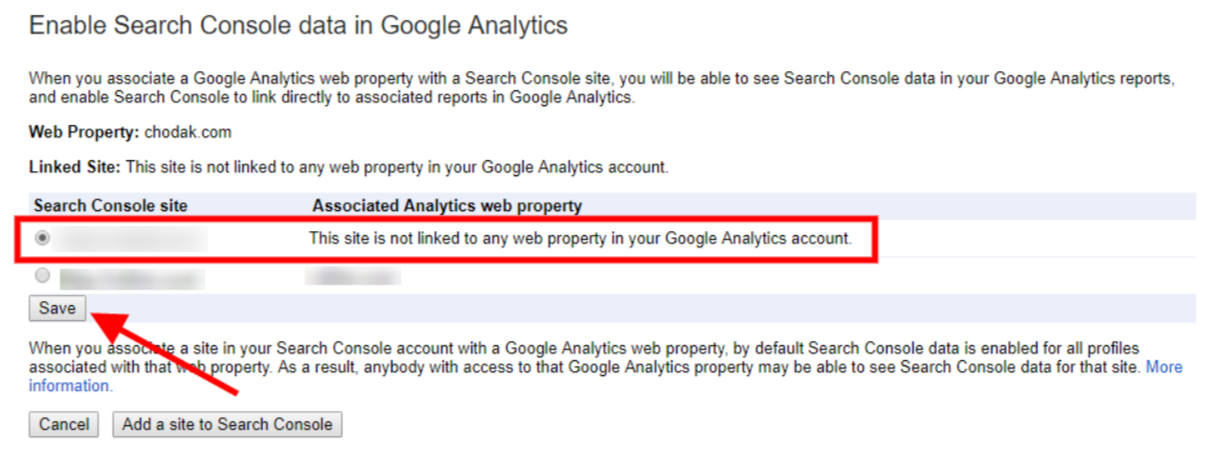
5. In Enable Search Console data, select your site and click Save.
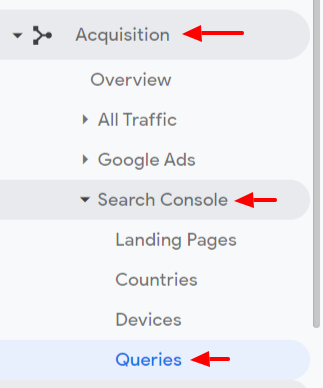
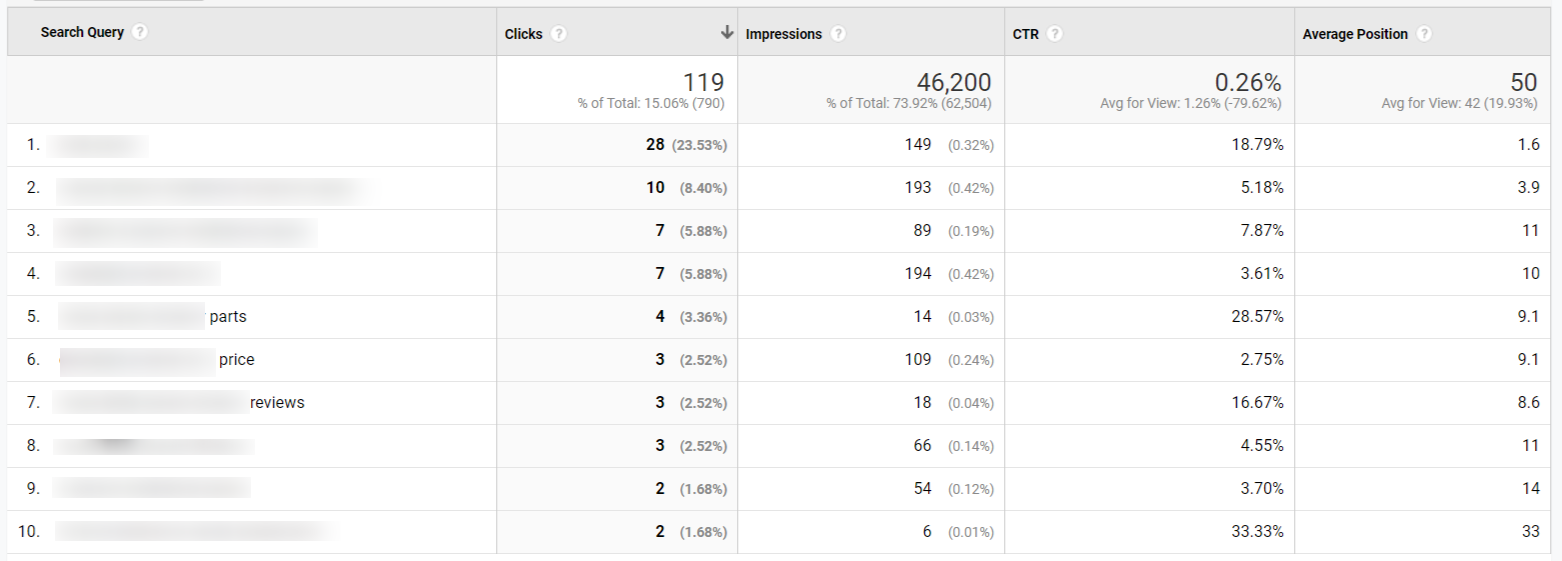
6. You should then begin to see search results soon. You’ll want to you navigate to Queries
7. Here, you can see a whole assortment of useful numbers. Like Clicks, Impressions, CTR, and your Average Position.
Focusing on your Shopify search results is crucial. How crucial?
Forrester Research found that 43% of visitors to a site go immediately to a search box. Not only that, but site searchers are 2-3 times more likely to convert.
So here’s how to start tracking your search terms within Google Analytics
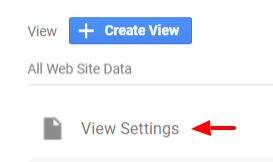
1. Go into your Google Analytics account and go to Admin
2. Click View Settings in the 3rd column.
3. Then click Site search Tracking to ON. And type ‘q’ without quotes for the Query parameter. Check the option “Strip query parameters out of URL”.
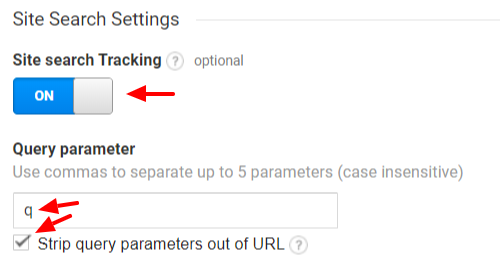
If you’re curious as to what this setting does, read on. If not, skip to the next section.
We are looking at the URL that is generated from a site search on your Shopify store.

We’re wanting the letter beyond the question mark, which is ‘q’.
This will grab the search that was typed in your store. As well as stripping out the other parameters like the + and & symbols.
Google Analytics is smart about being able to track links from other websites and paid/organic search traffic.
But what about an exact Facebook post? Or an influencer’s Instagram post? Or offline promotions?
Can you determine what source provided which visit? Chances are, it will end up in the “Direct” traffic when you view your reports.
An underrated feature of Google Analytics lies in the UTM parameters.
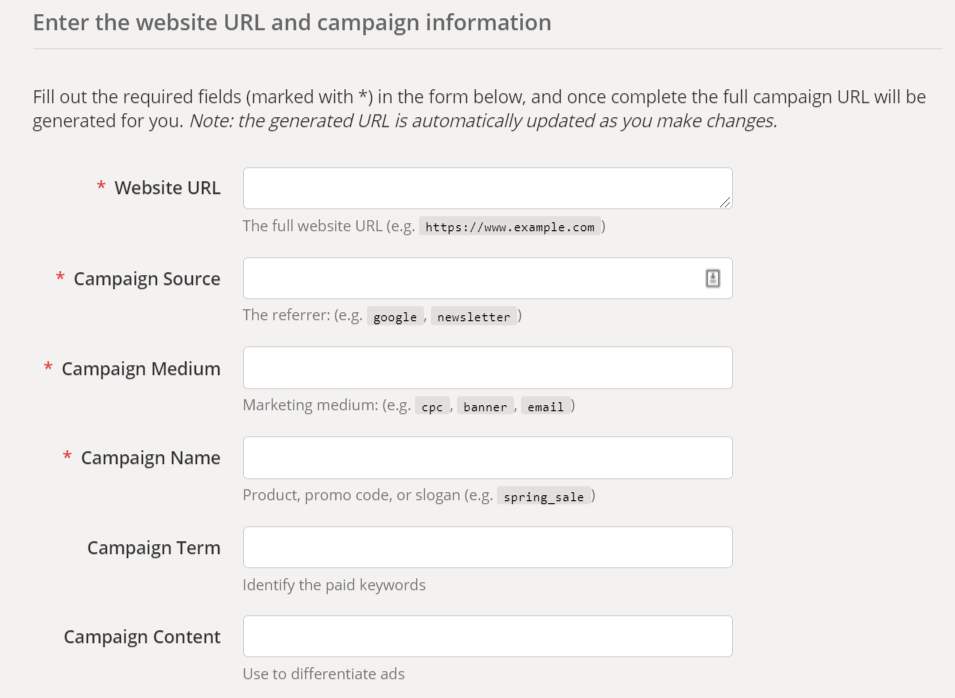
Google has a Campaign URL Builder that lets you create granular links that identify exact sources of traffic.
An example of what you might use:
Website: https://www.myshopifystore.com
Campaign Source: Instagram
Campaign Medium: social
Campaign Name: influencer_partner_user_name_holiday_sale_post
From there, you can take the custom link and shorten it and give it to your promoter or use it in a campaign of your choice.
The benefit? You can see exactly which campaigns brought you sales, so you can do more of that!
The most important part is to, well, analyze!
Here are some important questions to ask when reviewing your metrics:
What traffic sources are sending me the highest converting traffic?
How can I get more of that?
What are my highest converting pages?
How can I replicate that success?
How’s my site’s speed performing and is it affecting my user’s experience?
Are visitors looking at product pages?
If not, what’s keeping them from doing so?
If so, how can we get them to stay longer?
What products are generating the most revenue?
Should we put more focus into marketing these products?
Loox helps you empower your store with strong social proof by…
We mentioned that reviews in Loox can be tracked in Google Analytics.
Why is this important? And how can you benefit from these metrics?
Let’s look at the metrics that can be tracked and discuss each in a bit more detail.
This tells you if a visitor clicked and opened a specific review of a specific product and the quick view appeared as below:

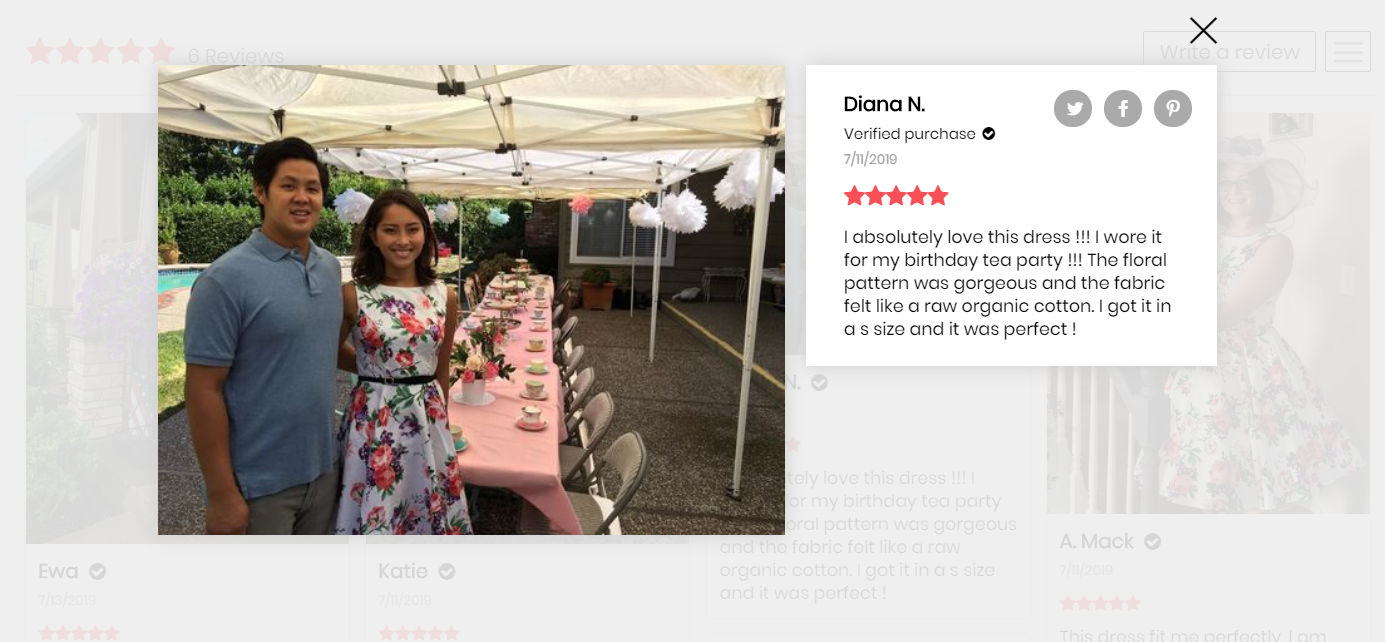
”When a review is clicked, a quick view of the review is opened. The quick view screen is the event”
The data pulled into Google Analytics is extensive.
The value will be the product ID of the product the review corresponds with.
The label will also include which widget the review was displayed on when clicked.
This way, you can know:
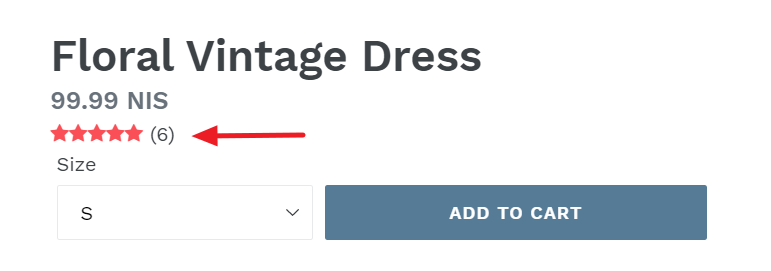
This is an important metric to follow because it lets you see which reviews are getting customers to buy (or not buy) your product.
Maybe you’ll discover there’s one particular review that’s turning your visitors into customers? (the dream!)
You may consider putting that review on the home page or even turning it into a case study.
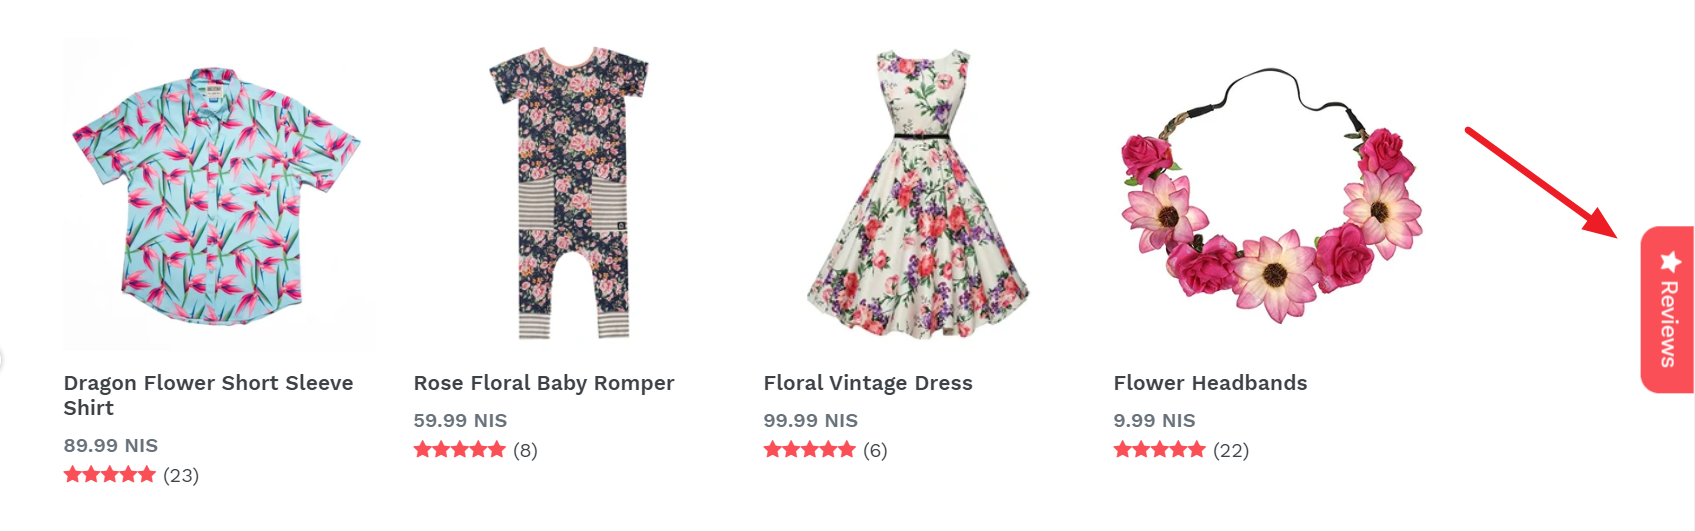
This tells you if a visitor clicked the review star rating on a particular product page and jumped straight to the reviews. As below:
Since the product ID is reported, you know which products have the most reviews read.
From this, you can see if the products that have more interaction with their reviews convert better than the ones without reviews.
This helps you understand the impact of social proof on your sales.
And if you’re on the fence whether or not people actually trust reviews…
According to studies, 72% of consumers trust online reviews as much as personal recommendations (Local Consumer Review Survey, 2012).
This is why it’s so important to start collecting reviews for your products if you aren’t already.
Set up automatic review request emails, today.
This tells you if a visitor clicked the Loox Sidebar widget and the floating Happy Customers page was displayed, as seen below:
The old marketing adage applies here that “you don’t know until you test”.
Having this metric helps you find out how many visitors are utilizing your sidebar widget to read reviews and rely on social proof.
Haven’t already? Enable the Sidebar widget, today.
The good news is that if you’re already using Loox and have followed the steps in this guide, these metrics should be collected automatically.
Loox now integrates directly to your Google Analytics account and is available out of the box on all plans.
Not using Loox yet? Get started now.
If you’ve read this far, you’re armed with some knowledge on how to install Google Analytics on Shopify that can give you a serious competitive edge in your industry. Now, you just have to implement, keep track, and analyze it.
Imagine reading over your Google Analytics and being able to pinpoint exactly what products are doing the best.
Speaking of products that do the best…
Did you know that having just five reviews results in purchase likelihood increasing by a factor of almost four times (Spiegel Research Center, 2017)
At Loox, our mission is to help you collect visual reviews on autopilot and display them in beautifully designed widgets across your store.
That’s about the closest we can get to simply sending you buyers 😀
We’re all about creating user-generated content to build trust with you and your audience. To help showcase your amazing products with social proof from the buyers.
If you haven’t already checked out Loox, give us a try. We’ll let you test it in your store, on us, for 14 days free. After that, it’s a monthly payment starting at just $9.99.
If you make a single $10 sale by converting a visitor into a buyer using your new stellar reviews, you’ve already made your money back.
Install Loox today and see how user-generated content can revolutionize your store.
%20(1).jpg)
%20(1).png)